Mastering Django: Step-by-Step Guide to Deploying Your Project on a Linux Server in 2024
What we will achieve?
By the end of this guide we should have a Django project deployed on a linux VPS server. We would also setup SSL/TLS certificates using Certbot.
The arcitecture we would achieve is as follows.
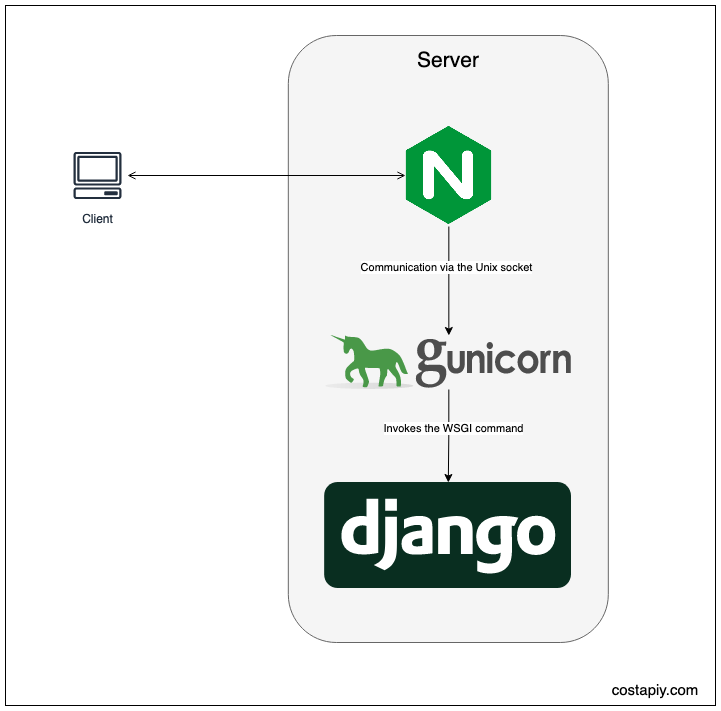
Table of Contents
- Deploy bare metal linux server
- Update server software
- Setup domain name
- Set hostname
- Set timezone
- Create a new user
- Allow only the new user to login via ssh.
2. Create and deploy a Django project
- Install python and dependencies
- Create a new ssh key pair for github
- Run the Django development server and check if it's accessible from the internet
3. Install and setup Gunicorn
- Install Gunicorn
- Create a systemd service to run gunicorn on startup
- Test if the project is accessible from Gunicorn instead of Django development server
4. Setup Nginx
- Create an nginx config usign nginxconfig.io
- Change some parts of the config to accommodate for Gunicorn (default is uWSGI)
- Install certbot and manage certificates
- Dry run cerbot cron certificate update
5. Firewall setup
- Setup firewall to only allow SSH, HTTP and HTTPS traffic
1. Deploy bare metal linux server
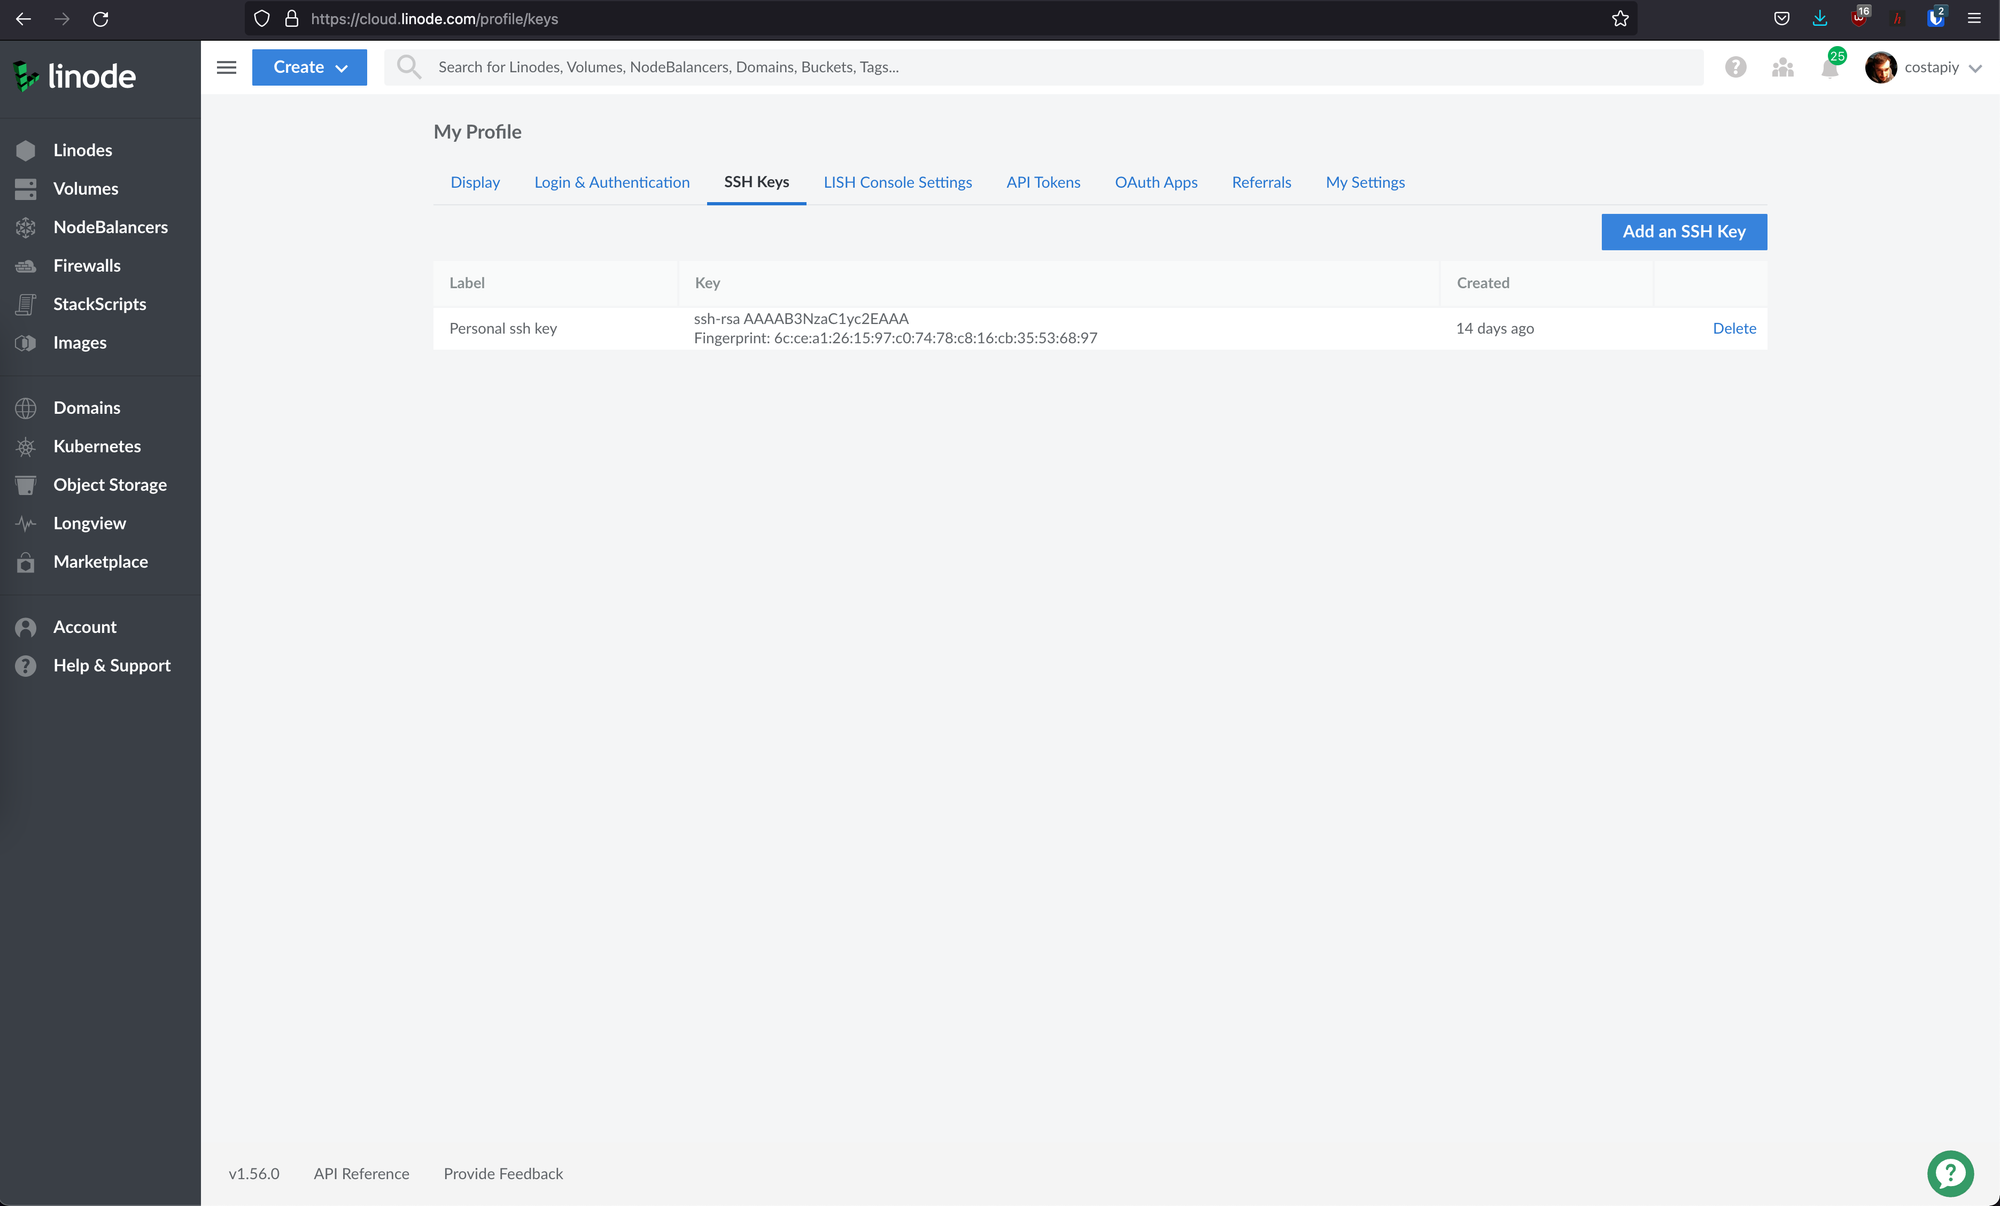
Usually, when I deploy a linux server I reach for Ubuntu LTS release. At the time of this tutorial on Linode the latest version is Ubuntu 20.04 LTS. Also, add your public SSH key to linode and use it with this server. You can do this by navigating in your profile under the SSH keys and add your public key.
Setup domain name
Let's first setup the domain name. We do this first since DNS propagation takes some time. By the time we need to test if our domain name working hopefully it should have been propagated.
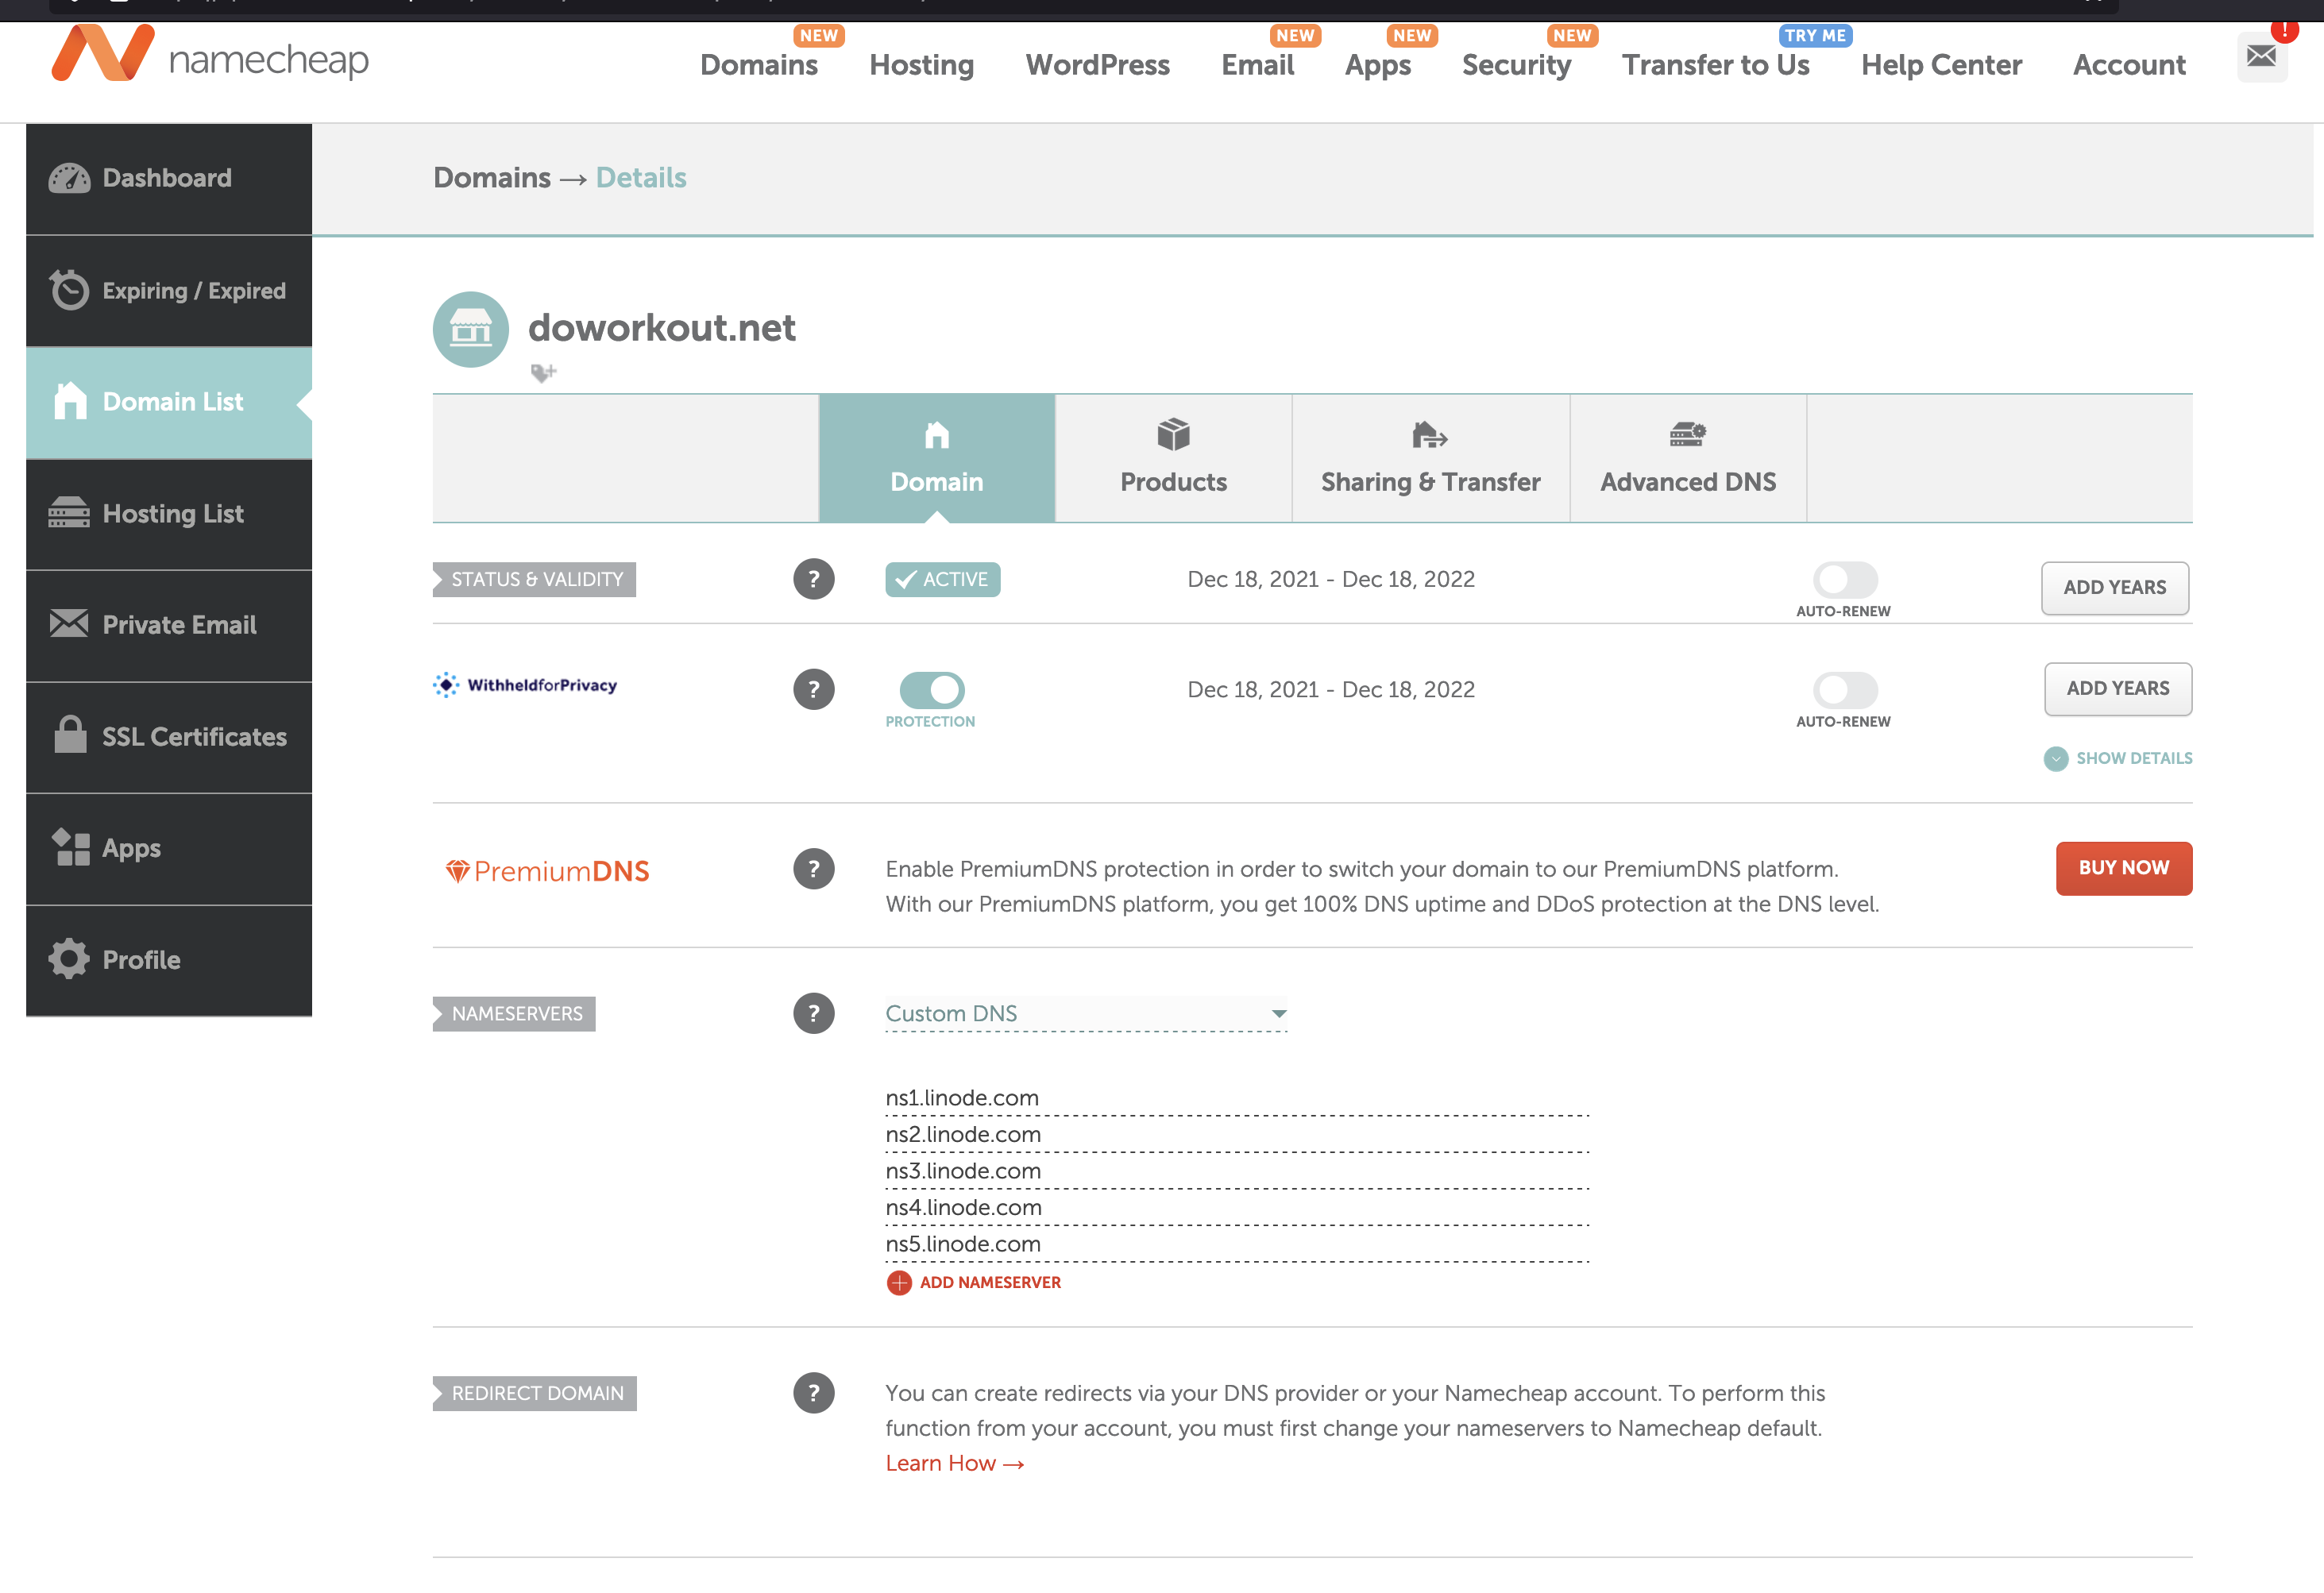
I bought the domain name from Namecheap. The server runs on Linode. Therefore, I need to use Linode's domain servers in Namecheap as shown below.
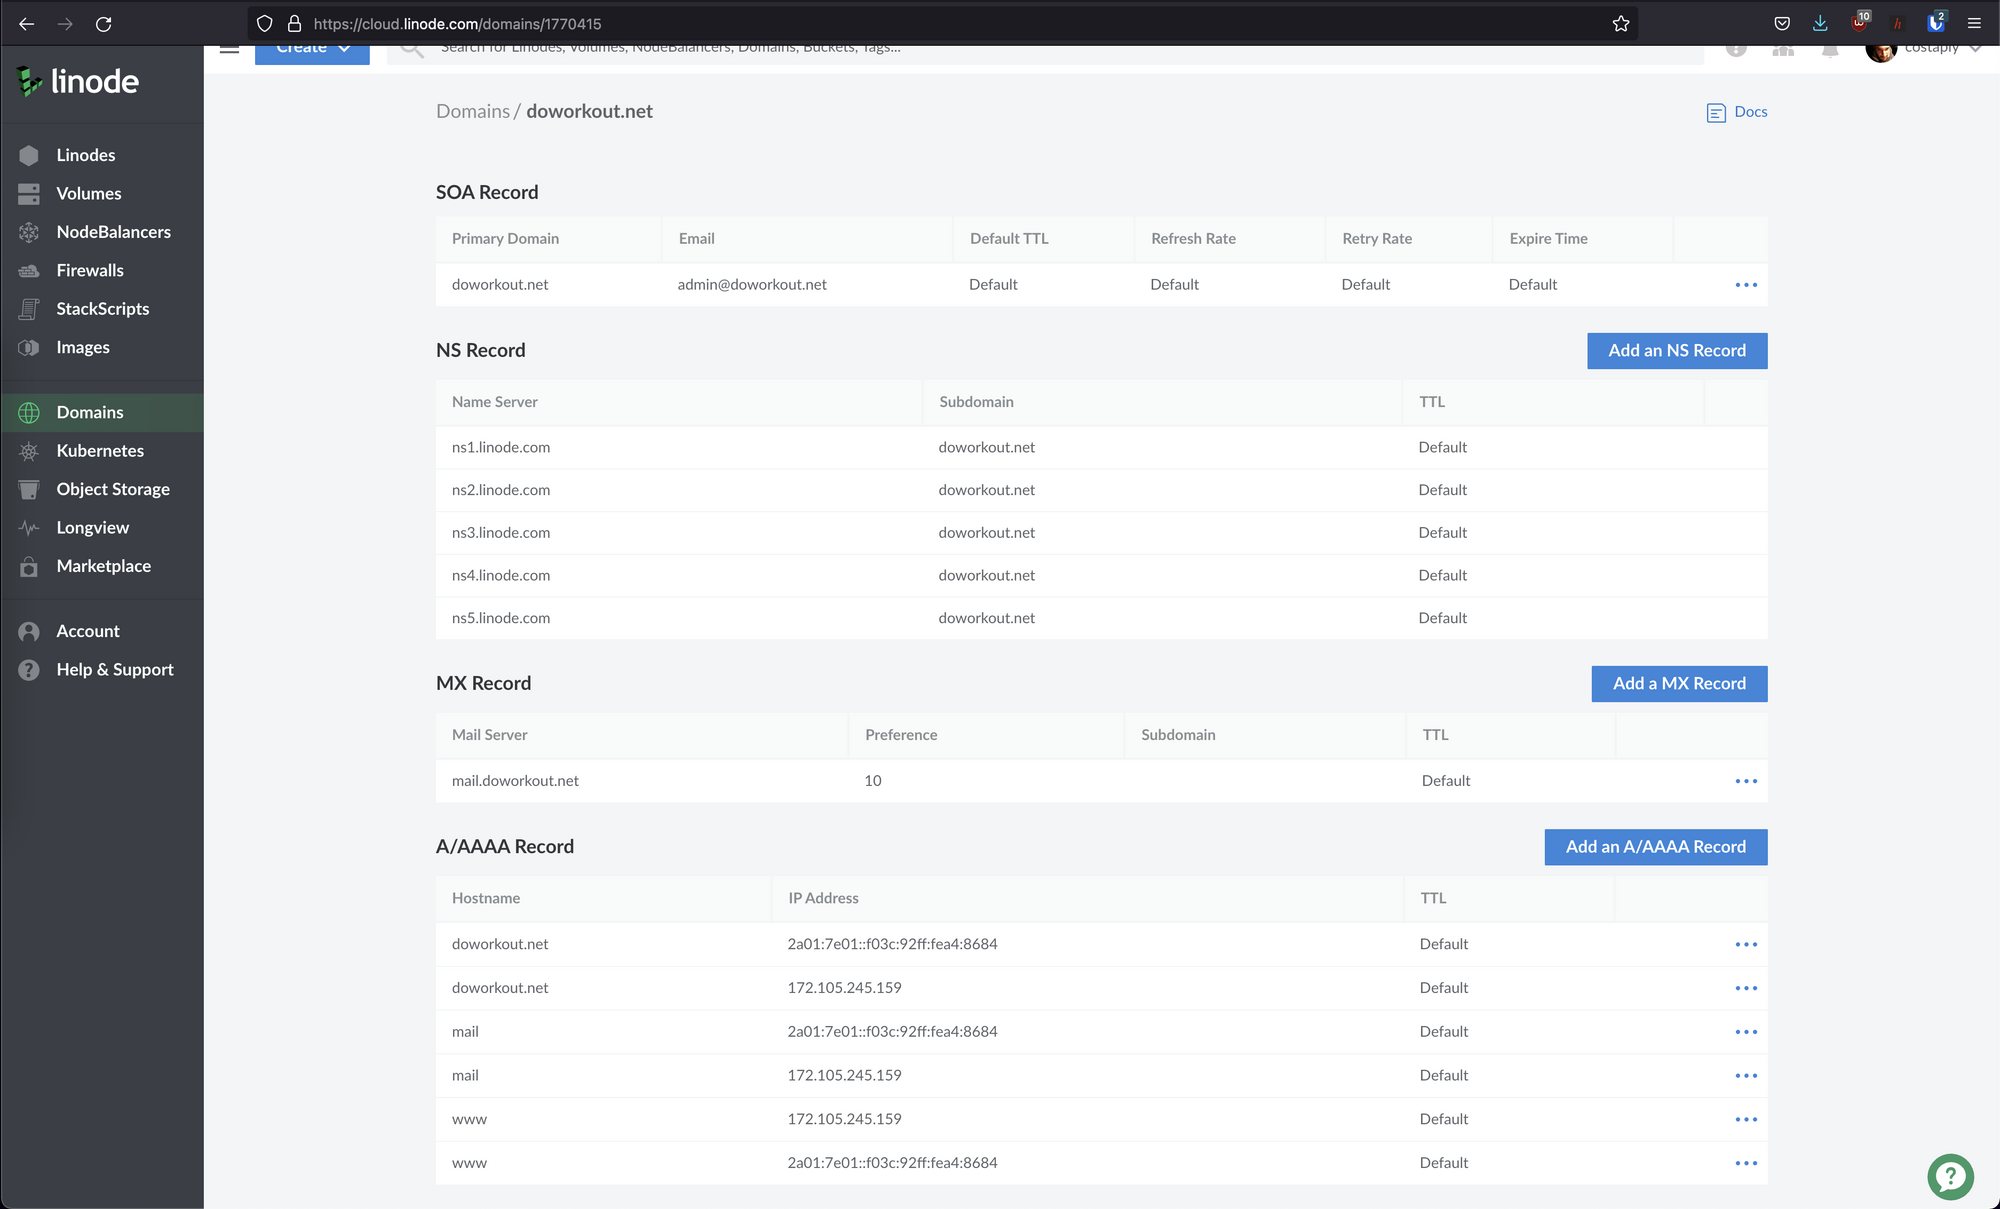
Next, on Linode you will need to create a new domain. I used the default configuration and it works fine. If you don't want to use the default configuration you'll need to manually setup A records, MX records etc. Check the images below.
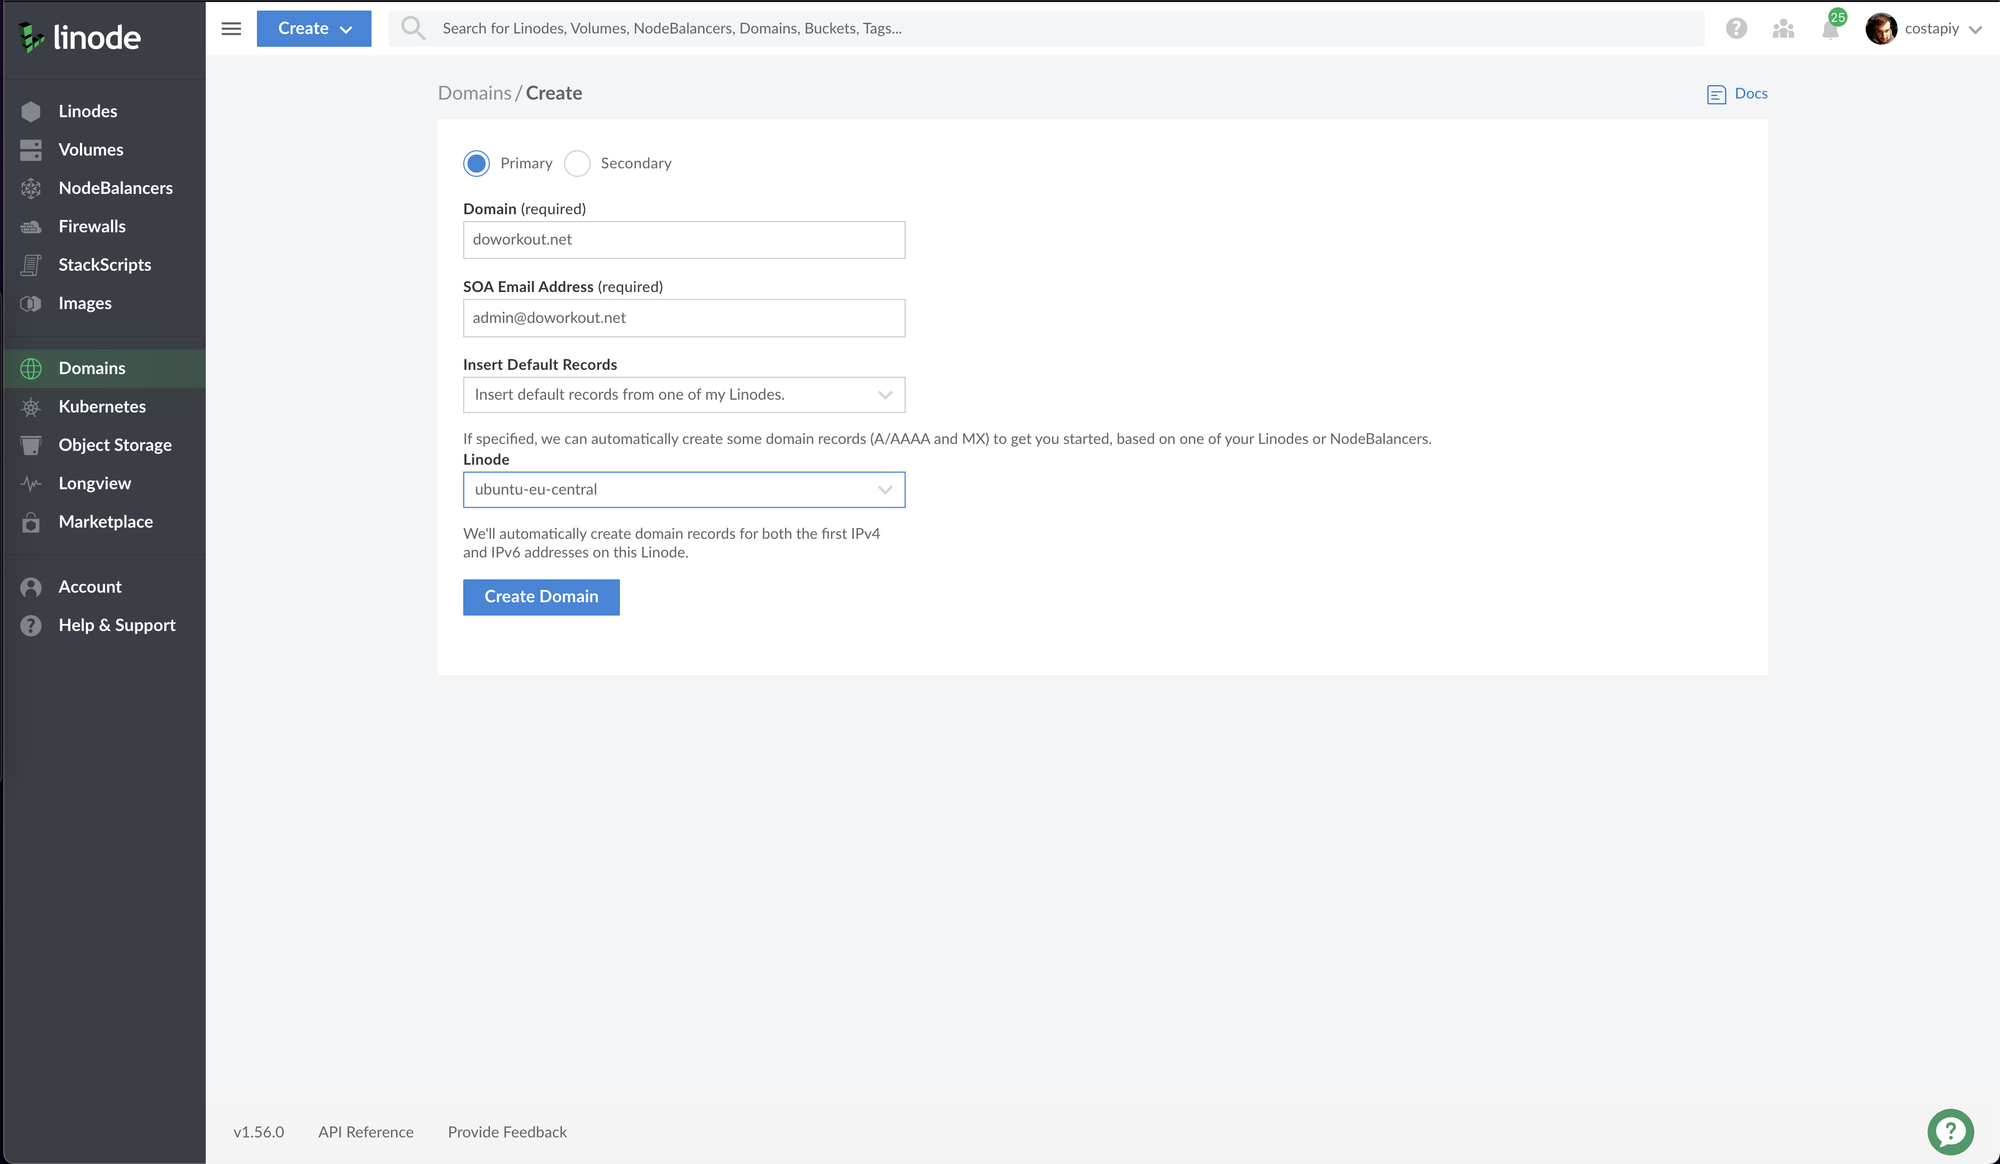
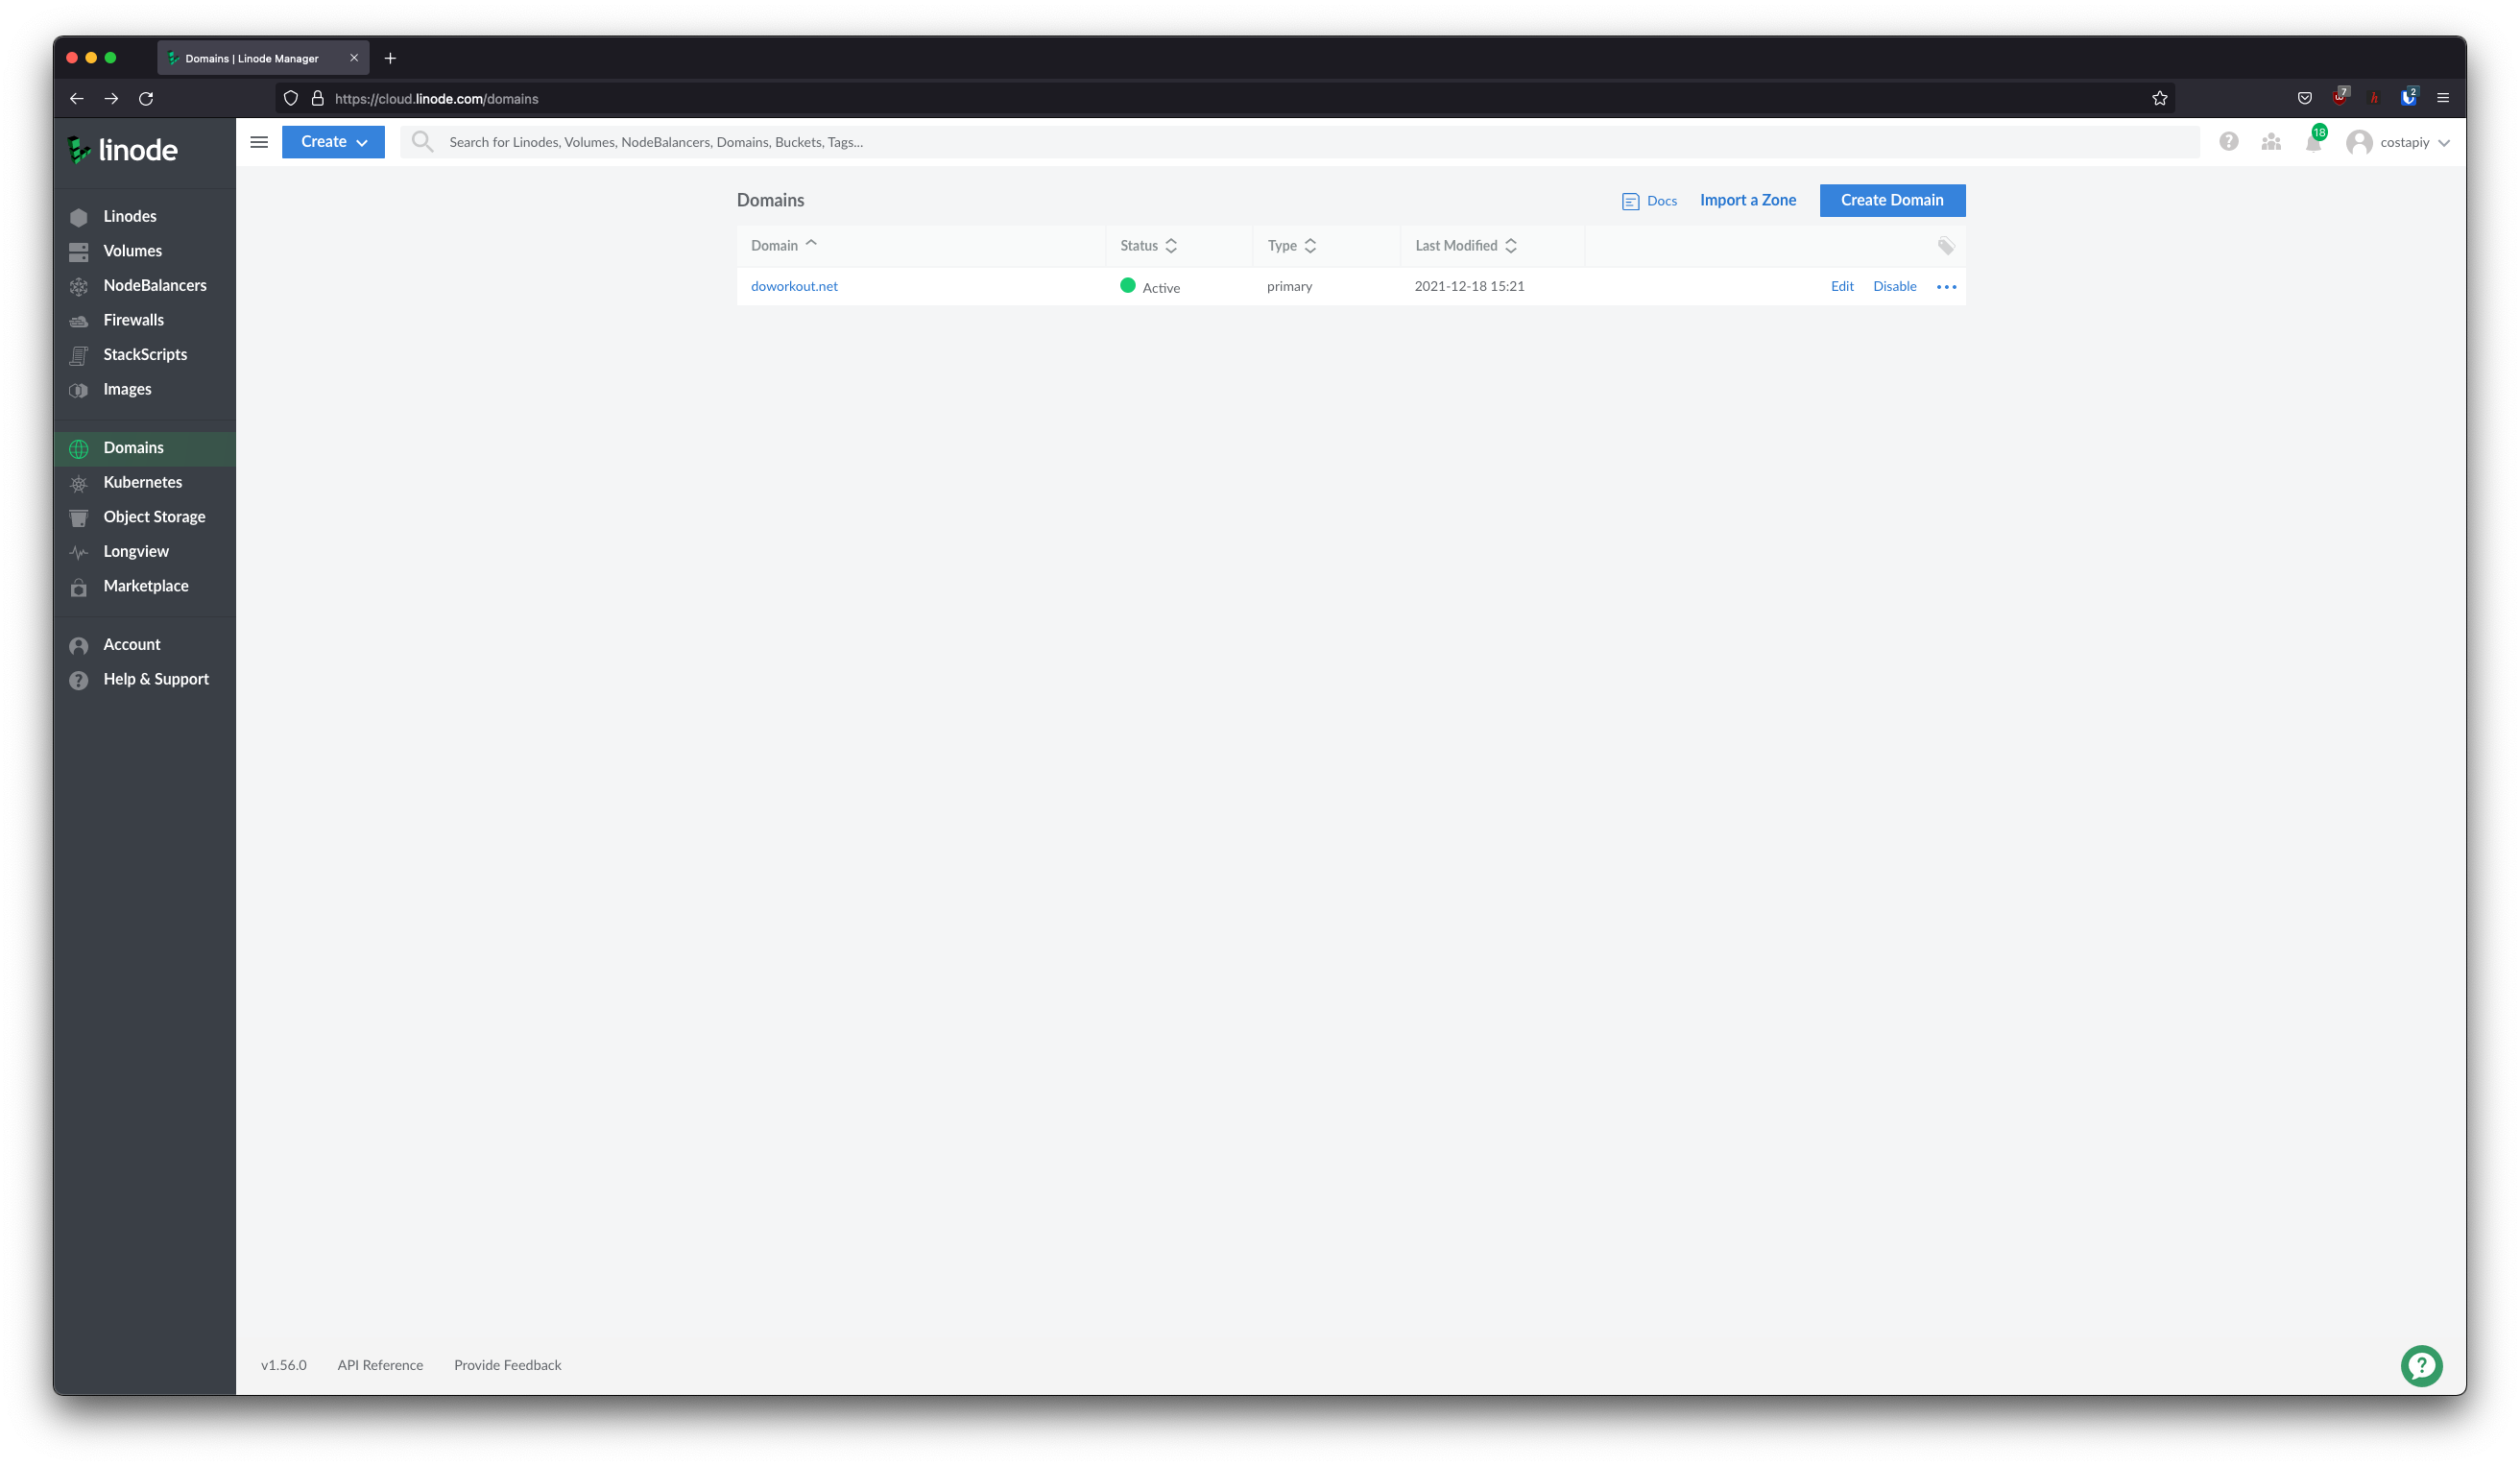
Note: If you have to setup the DNS records manually use the below image for reference. Otherwise, you will already have this if you followed the s
Update server software
To update the existing software on a fresh install lets do:
apt-get update && apt-get upgradeSet hostname
Here you need to set the server's hostname. Replace <your-hostname> with your prefer hostname. For example, I used `costapiy-server`
hostnamectl set-hostname <your-hostname>
hostname
Then, you'll need to add the hostname to your hosts file. Edit the file using Vim as below.
vim /etc/hosts

# Add a line similar to:
<server-ip> <host-name>
For example, mine looks like this.
# /etc/hosts
127.0.0.1       localhost
172.105.245.159 costapiy-server

# The following lines are desirable for IPv6 capable hosts
::1             localhost ip6-localhost ip6-loopback
ff02::1         ip6-allnodes
ff02::2         ip6-allrouters
Set timezone
Let's set the timezone to UTC. You can choose a different timezone based on your needs. I always try to use UTC in all my projects since it's easier for me to remember.
timedatectl set-timezone UTCCreate a new user
So far, we were running the above commands as the root user. In general, is not a good idea to run everything as root since if your server is compromised then the adversary will have root access and can do anything in your system.
To create a new user:
adduser webserver
usermod -aG sudo webserver
Change to this user:
su webserverCreate a new directory for SSH stuff
cd
mkdir ~/.ssh
Set the permissions to only allow this user into it
chmod 700 ~/.ssh
Create a file for SSH keys
vim ~/.ssh/authorized_keys
Use the root user to copy .ssh files
This command will change the user from webserver to root again
sudo su
cd
Copy the ~/.ssh/authorized_keys from root folder to the new user folder
cp .ssh/authorized_keys /home/webserver/.ssh/authorized_keys
su webserver
sudo chown webserver:webserver  ~/.ssh/authorized_keys
sudo chmod 600 ~/.ssh/authorized_keys
Logout from this ssh session
Use the exit command to logout of the ssh session as many times as required.
Log into your server as the new user
# Replace the IP address with your own
ssh webserver@50.116.6.17
Allow only the new user to login via ssh.
sudo vim /etc/ssh/sshd_configNOTE: You will be asked for a password when you use the sudo command. This is the password you used when you created the user earlier in this tutorial. Inside, you need to update two settings:
- Find
PermitRootLoginand change it toPermitRootLogin no - Find
PasswordAuthenticationand change it toPasswordAuthentication no
Reload the ssh deamon for the changes to be applied
sudo systemctl reload sshdThis will achieve two things:
- You'll be able to login as the webserver user without password
- You'll NOT be able to login as root user. (Which is more secure)
2. Create and deploy a Django project
Install python and dependencies
Here will install the python dependencies on our VPS.
sudo apt-get install python3-pip python3-dev nginx
sudo -H pip3 install --upgrade pip
sudo -H pip3 install virtualenv
Create a new ssh key pair for github
At this point we need a way to transfer our code to the linux server. There are multiple different approaches for this. I chose a simple one, Git and Github. The workflow is as follows.
- Make changes locally and push to Github.
- Login to the server and pull from Github the changes.
ssh-keygen -t rsa
cat ~/.ssh/id_rsa.pub
Copy the output of the above command to Github. This will enable you to pull the code from Github without the need to use a password.
On the webserver clone / upload your project
Clone your project from github. If this is successful you should have the project in your home directory on the server.
cd
git clone git@github.com:username/repository.git
Create virtual env for project doworkout
virtualenv doworkout
source doworkout/bin/activate
pip install django
Apply db migrations
My project folder is doworkout. Therefore, I have to navigate to that folder and run the migrations. This will create the necessary database file and tables.
cd
cd doworkout
python manage.py migrate
python manage.py createsuperuser
Run the development server
python manage.py runserver 0.0.0.0:8000Now our project should be accessible from the internet on port 8000. You can check by navigating to http://server-ip:8000. You might see a Django specific error message saying to add the server ip to the allowed hosts.
Modify project/settings.py to add the server ip
ALLOWED_HOSTS = ['192.46.237.55']
At this point the django development server should work normally without any errors.
Generate Django's static files
Since Django is served using a WSGI compatible server, it's necessary to serve static files using NGINX since it's much more efficient in serving static files. Django has a command to create all the static files. We need to setup where we want this static files to be generated.
Add this to settings.py
The static files will be generated under the directory project/static
STATIC_URL = 'static/'
STATIC_ROOT = os.path.join(BASE_DIR, 'static/')
Collect (generate) all the static files
python manage.py collectstatic
# 128 static files copied to '/home/webserver/doworkout/static'.
3. Install and setup Gunicorn
Test if gunicorn can server our project
This will create a virtual environment called doworkout. I like to create a python virtual environment per project. It will install Gunicorn in the virtual environment as recommended by Gunicorn documentation here. Last it will start Gunicorn and server our project on port 8000 again. (If you run the development server on port 8000 you'll need to stop it)
source doworkout/bin/activate
pip install gunicorn
cd ~/doworkout
gunicorn --bind 0.0.0.0:8000 doworkout.wsgi
Gunicorn works, but we are not serving static files anymore. You can see there is no css served for the admin pages. Again, you can navigate to http://server-ip:8000/admin. You'll notice that the admin page now is only the html without any css styling. This is because our static files are not served using Gunicorn. They will get served by NGINX in section 4 below.
Create systemd service to run gunicorn
We need to run Gunicorn as systemd service. Essentially, this will run Gunicorn as a deamon instead of a normal process. We want to use systemd to do this since it will take care of running Gunicorn if it crashes or if the system restarts.
Create a file called gunicorn-doworkout.service to save the Gunicorn systemd configuration. You can change the name to be related to your project name.
deactivate
sudo vim /etc/systemd/system/gunicorn-doworkout.service
Contents of the file /etc/systemd/system/gunicorn-doworkout.service
Make sure to change the User, paths and filenames accordingly.
[Unit]
Description=gunicorn daemon
After=network.target

[Service]
User=webserver
Group=www-data
WorkingDirectory=/home/webserver/doworkout
ExecStart=/home/webserver/doworkout/bin/gunicorn --access-logfile - --workers 3 --bind unix:/home/webserver/doworkout/doworkout.sock doworkout.wsgi:application

[Install]
WantedBy=multi-user.target
Create the service and enable it
sudo systemctl start gunicorn-doworkout
sudo systemctl enable gunicorn-doworkout
Check the gunicorn socket file
sudo systemctl status gunicorn-doworkoutHere if you should see something similar to this. Also, on the project folder you should see the socket file.
webserver@costapiy-server:~$ sudo systemctl status gunicorn-doworkout
[sudo] password for webserver:
● gunicorn-doworkout.service - gunicorn daemon
     Loaded: loaded (/etc/systemd/system/gunicorn-doworkout.service; enabled; vendor preset: enabled)
     Active: active (running) since Thu 2021-12-30 20:44:02 UTC; 14h ago
   Main PID: 1781 (gunicorn)
      Tasks: 4 (limit: 1071)
     Memory: 88.9M
     CGroup: /system.slice/gunicorn-doworkout.service
             ├─1781 /home/webserver/doworkout/bin/python /home/webserver/doworkout/bin/gunicorn --access-logfile - --workers 3 --bind unix:/home/webserver/doworkout/do>
             ├─1793 /home/webserver/doworkout/bin/python /home/webserver/doworkout/bin/gunicorn --access-logfile - --workers 3 --bind unix:/home/webserver/doworkout/do>
             ├─1794 /home/webserver/doworkout/bin/python /home/webserver/doworkout/bin/gunicorn --access-logfile - --workers 3 --bind unix:/home/webserver/doworkout/do>
└─1795 /home/webserver/doworkout/bin/python /home/webserver/doworkout/bin/gunicorn --access-logfile - --workers 3 --bind unix:/home/webserver/doworkout/do>4. Setup NGINX
Follow the guide here. Only use this to generate the files. Do not use this for setting up certbot since will do it later. This will generate almost all the necessary files we need. We just need to make some minor adjustments since the default setup is for use with uWSGI and we are using Gunicorn.
Copy the files to your /etc/nginx directory.
Delete one unnecessary file
sudo rm -f /etc/nginx/nginxconfig.io/security.confWe need to change one location block here to use the Gunicorn setup.
Again, you'll need to be careful here to use the correct domain names and paths.
Basically, from
location / {
        include nginxconfig.io/python_uwsgi.conf;
    }
to
 location / {
        include proxy_params;
        proxy_pass http://unix:/home/webserver/doworkout/doworkout.sock;
    }
The finished file with the modifications /etc/nginx/sites-available/doworkout.net.conf
server {
    listen                  443 ssl http2;
    listen                  [::]:443 ssl http2;
    server_name             doworkout.net;
    set                     $base /home/webserver/doworkout;

    # SSL
    ssl_certificate         /etc/letsencrypt/live/doworkout.net/fullchain.pem;
    ssl_certificate_key     /etc/letsencrypt/live/doworkout.net/privkey.pem;
    ssl_trusted_certificate /etc/letsencrypt/live/doworkout.net/chain.pem;

    # security
    include                 nginxconfig.io/security.conf;

    location / {
        include proxy_params;
        proxy_pass http://unix:/home/webserver/doworkout/doworkout.sock;
    }

    # Django media
    location /media/ {
        alias $base/media/;
    }

    # Django static
    location /static/ {
        alias $base/static/;
    }

    # additional config
    include nginxconfig.io/general.conf;
}

# subdomains redirect
server {
    listen                  443 ssl http2;
    listen                  [::]:443 ssl http2;
    server_name             *.doworkout.net;

    # SSL
    ssl_certificate         /etc/letsencrypt/live/doworkout.net/fullchain.pem;
    ssl_certificate_key     /etc/letsencrypt/live/doworkout.net/privkey.pem;
    ssl_trusted_certificate /etc/letsencrypt/live/doworkout.net/chain.pem;
    return                  301 https://doworkout.net$request_uri;
}

# HTTP redirect
server {
    listen      80;
    listen      [::]:80;
    server_name .doworkout.net;
    include     nginxconfig.io/letsencrypt.conf;

    location / {
        return 301 https://doworkout.net$request_uri;
    }
}
Restart NGINX and Gunicorn
sudo systemctl restart nginx
sudo systemctl daemon-reload
sudo systemctl restart gunicorn
Install Certbot
NOTE: Make sure you are not in a virtual env
deactivate
sudo apt-get install python3-certbot-nginx
Generate the SSL/TLS certificate
Change the domain name to match yours. Add both variants of the domain name domain.com and www.domain.com
sudo certbot certonly --standalone -d doworkout.net -d www.doworkout.netFix cron renwal
Our Certbot installation create a cron job to run everyday and try to update the SSL/TLS certificate. It needs a bit of tweaking in order to work as expected.
sudo vim /etc/cron.d/certbot

# Add the following.
0 */12 * * * root test -x /usr/bin/certbot -a \! -d /run/systemd/system && perl -e 'sleep int(rand(43200))' && certbot -q renew --nginx
Test if renewal works
Certbot has a dry run functionality. This allows us to test if the renewal will work but it doesn't update the certificates. It just simulates an update.
sudo certbot renew --nginx --dry-runMight get the following error
Error output from post-hook command nginx-reload.sh: nginx: the configuration file /etc/nginx/nginx.conf syntax is ok nginx: configuration file /etc/nginx/nginx.conf test is successful
However, it should be working as expected now.
Restart NGINX
By restarting NGINX you should be able to navigate to your domain name and the Django project will be served as expected using HTTPS.
sudo service nginx status
At this point, if you try to navigate to the HTTP it will redirect you to the HTTPS version. In addition, if you navigate to www.domain.com it should also redirect you to the non-www version.
5. Firewall setup
Last, we will harden the server to only allow SSH, HTTP and HTTPS connections.
# Reset all existing rules
sudo ufw reset

# Enable OpenSSH connections
sudo ufw allow OpenSSH

# Enable HTTP traffic
sudo ufw allow http

# Enable HTTPS traffic
sudo ufw allow https

# Turn the firewall on
sudo ufw enable
6. THE END
Congratulations! You made it to the end.
At this point you should have a working django deployment available to for the whole world to see :)
If you like the content here please consider subscribing.
I will create a video of this guide as well in the future. If you want to get notified when the video tutorial is ready subscribe.
If you have any comments or feedback feel free to reach me @costapiy
Member discussion